Business & FinanceTypography / Photography
Strong listing photos are the fastest way to earn clicks, showings, and faster closings. Buyers form their first opinion in seconds, and according to the National Association of REALTORS®, 81% of online searchers rate photos as very useful—the top website feature. Get the photography right and everything else in your marketing works harder. These real estate photography tips for agents give you a practical system you can use on every listing, whether you shoot it yourself or hire a pro.
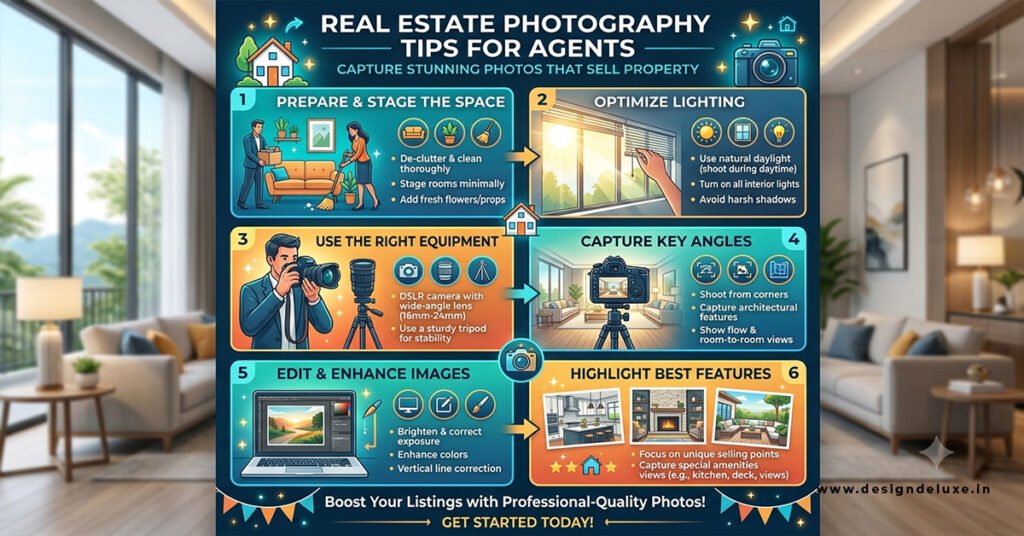
Quick overview of what actually moves the needle:
- Prep the home thoroughly before anyone lifts a camera.
- Lead with a strong exterior hero shot and shoot from corners at chest height.
- Use natural light, keep vertical lines straight, and deliver 22–30 well-ordered images for most homes.
- Edit only for accuracy—never to hide defects or invent features.
- Treat photography as the foundation of broader Real Estate Marketing Design: Sell Properties Faster.
Why Photography Still Rules Listing Performance
Buyers screen dozens of homes online before they ever step inside. Weak photos kill interest before your description or price even registers. Professional-level images generate far more views and help qualified buyers self-select. In practice, the difference shows up in days on market and the quality of offers that come in.
The goal is not art-gallery perfection. It is clear, bright, honest images that let a buyer understand the space and feel excited about seeing it in person.
Prep Work That Makes or Breaks the Shoot
Never skip the staging and declutter phase. What usually happens is agents rush to shoot and then spend hours trying to fix clutter in post. That approach fails.
Give sellers a simple checklist 48 hours ahead:
- Clear every countertop, table, and visible surface.
- Remove personal photos, magnets, and excess décor.
- Hide trash cans, cords, laundry, and pet items.
- Open all blinds and curtains; turn on every light (replace any burnt-out bulbs).
- Mow the lawn, sweep walkways, and stage outdoor seating if you have it.
- Move cars out of the driveway for exterior shots.
A clean, bright space photographs itself. Clutter forces the eye away from the architecture and finishes that actually sell the home.
Camera and Setup Basics Agents Can Master
You do not need the most expensive gear. A modern smartphone with a good ultrawide lens plus a small tripod can produce usable results for lower-price listings. For consistent professional quality, a mirrorless or DSLR with a 16–35mm (or equivalent) wide-angle lens and a sturdy tripod is the standard.
Key settings that work almost every time:
- Height: chest level, roughly 4–5 feet off the floor.
- Aperture: f/8 to f/11 for sharp rooms from front to back.
- ISO: keep it low (100–400) for clean files.
- Shoot RAW or the highest quality JPEG your camera offers.
- Bracket exposures when windows are bright so you can balance interior and exterior light later.
Always level the camera. Crooked vertical lines scream amateur and make rooms feel off-kilter.
Composition Rules That Create Depth
Stand in a corner or doorway and shoot across the room so you capture two or three walls plus the floor. This shows scale and flow. Flat wall-on shots flatten space and hide how rooms connect.
Shoot every major room from at least two angles. Capture the hero view first, then a secondary angle that highlights a feature—fireplace, island, built-ins, or view. Detail shots of kitchens and primary baths help; those rooms sell homes.
For exteriors, the front elevation is almost always your primary photo. Stand far enough back to show the full facade, roofline, and landscaping. Golden hour (early morning or late afternoon) gives warmer light and better curb appeal. Overcast days work well for even light without harsh shadows.
Shot List That Covers Buyer Expectations
Aim for 22–30 final images on a typical 1,500–3,000 sq ft home. Fewer than 15 often signals something is being hidden; more than 40 can dilute impact unless the property is large or luxury.
Standard order that performs well:
- Strongest exterior (usually front elevation)
- Living or great room
- Kitchen
- Primary bedroom and bath
- Additional living spaces and bedrooms
- Outdoor living and yard
- Any unique features (office, finished basement, view)
Upload in walk-through order so buyers experience the home the way they would on a showing.
Editing Rules Agents Must Follow
Correct what the camera got wrong: exposure, white balance, lens distortion, and vertical lines. Do not change what the property looks like. Removing permanent defects, altering views, or inventing features crosses into misrepresentation under the NAR Code of Ethics and most MLS rules.
Virtual staging of empty rooms is fine when clearly labeled. Sky replacement and object removal of temporary clutter are common but should be disclosed where required by state or local rules (California already has specific disclosure requirements for digitally altered images).
Keep originals. Some markets now require access to unaltered files if an image has been changed.
Common Mistakes and Fast Fixes
Shooting at the wrong height or angle. Fix: always use a tripod at chest height and level the camera.
Clutter left in frame. Fix: the pre-shoot checklist above. It is cheaper than editing later.
Dark interiors and blown-out windows. Fix: lights on, blinds open, bracket exposures, and blend in post if needed.
Inconsistent color and brightness across the gallery. Fix: apply the same white-balance and exposure approach to every image.
Leading with a weak or interior shot. Fix: make the best exterior or signature room the primary photo. Portals and MLS systems push that image hardest.
Too few photos or random order. Fix: follow a standard shot list and sequence them as a logical walk-through.
How These Tips Fit Into Broader Marketing
Photography is the foundation, but it works best when it feeds a complete visual system. Clean, consistent images power your flyers, social graphics, email campaigns, and listing pages. That is exactly why these real estate photography tips for agents connect directly to stronger overall Real Estate Marketing Design: Sell Properties Faster. When the photos are solid, every other design decision becomes easier and more effective.
Practical Next Steps for Agents
- Create a one-page seller prep checklist and send it with every listing agreement.
- Build or download a standard shot list and keep it on your phone.
- Decide whether you will shoot yourself or hire a specialist. If hiring, require 24–48 hour turnaround and delivery of both edited and original files.
- Review your last three listings against the composition and order rules above. Note the gaps.
- Apply the same standards on the next property you list. Measure the difference in views and showing requests.
Do this consistently and photography stops being a scramble. It becomes a reliable competitive edge.
Key Takeaways
- Prep and lighting matter more than expensive gear.
- Shoot from corners at chest height with vertical lines straight.
- Lead with a strong exterior and deliver 22–30 ordered images for most homes.
- Edit for accuracy only—never to misrepresent the property.
- Consistency across the full gallery builds buyer trust.
- Strong photos amplify every other piece of your marketing system.
- Use a repeatable checklist so quality does not depend on luck or time pressure.
Master these real estate photography tips for agents and you give every listing a fair shot at faster attention and stronger results. Pair the images with clean design hierarchy and consistent branding, and you have the complete package that helps properties move.
FAQs
What is the ideal number of photos for a real estate listing?
Most residential listings perform best with 22–30 high-quality images. Fewer than 15 often makes buyers assume something is hidden, while more than 40 can dilute impact unless the home is large or luxury. Always lead with the strongest exterior shot and sequence the rest in walk-through order.
Can agents use smartphone photos for listings, or is professional gear required?
A modern smartphone with a good ultrawide lens and tripod can produce usable results for lower-price or lower-competition properties. For consistent professional quality that drives more views and faster sales, a camera with a wide-angle lens (16–35mm equivalent) plus proper lighting and composition techniques is strongly preferred.
What photo editing is allowed without disclosure?
You can correct exposure, white balance, lens distortion, and vertical lines. Do not remove permanent defects, alter views, change finishes, or invent features. Virtual staging of empty rooms and certain object removals usually require clear labeling under NAR ethics rules and many MLS guidelines—always check local requirements.